Gallery

Friday, August 29, 2014

Just Add Ink #229....Inspiration!


This week we have a very happy & bright Inspiration challenge happening over at Just Add Ink....So many options for this one.
I took my inspiration from the layered cake in the Mason jar for my side panel and popped a whole lot of star confetti punched with the cute new star border from SU, behind an acetate window to reflect the glass idea.
Fun & Simple, but l think it fits the brief pretty well..:0)


Don't forget to pop over and check out the happy created by the design team at Just Add Ink.

"Thanks for stopping by"
All supplies used are Stampin Up!

Wednesday, August 27, 2014

Wondrous Birthday Wreath!


Good Morning!....Have you had enough of the Wondrous Wreath projects yet..:0) I promise this is the last one for a bit, I'll move onto something else soon..:0)
With the idea of using this bundle for non Christmas, l inked this one up with Hello Honey and paired it with Wisteria Wonder.....So pretty together!


"Thanks for stopping by"
All supplies used are Stampin Up!

Tuesday, August 26, 2014

Wondrous Wreath.....


Hey there!...Just popped in to share another Wondrous Wreath project. This ones pretty cas and a bit more traditional in colour, it uses the yummy new Under the Tree Specialty DSP, this paper is so thick, you really can't call it a paper, more a cardboard, it's great for making boxes and has some lovely patterns, all on Kraft backgrounds.


"Thanks for stopping by"
All supplies used are Stampin Up!

Sunday, August 24, 2014

Wondrous Wreath...Casing the Catty!


With the countdown to the "Holiday Catalogue" release seriously underway, l decided to do something l tell myself I'm going to do every year and that is CASE some of the gorgeous samples in them and this one just stood out and begged to be cased..:0)
I pretty much cased it exactly, only adding an extra base layer and substituting the ribbon for what l had on hand and love how it turned out.


"Thanks for stopping by"
All supplies used are Stampin Up!

Friday, August 22, 2014

Just Add Ink #228.....Colour!


Another week has just flown by and with an icky dose of the lurgy, I'm feeling a little jibbed. The weather has been very pleasant and l had so many things planned, but to be honest, l have achieved none of them..:0(  Preferring to hide out in my playroom sneezing and spluttering all over my toy's instead! 
Which actually wasn't all that bad really, as l managed to create some samples for upcoming Just Add Ink challenges and some just for fun with a few new toys, so not all was lost..:0)

The lovely colours for this week were chosen by Kim and using various combinations, the design team have created some fab projects to inspire!
As you can see l opted for predominantly Blackberry Bliss, with hints of Moss & Calypso and again with the Tiny Triangles embossing folder..:0)


"Thanks for stopping by"
All supplies used are Stampin Up!

Thursday, August 21, 2014

Festival of Trees......


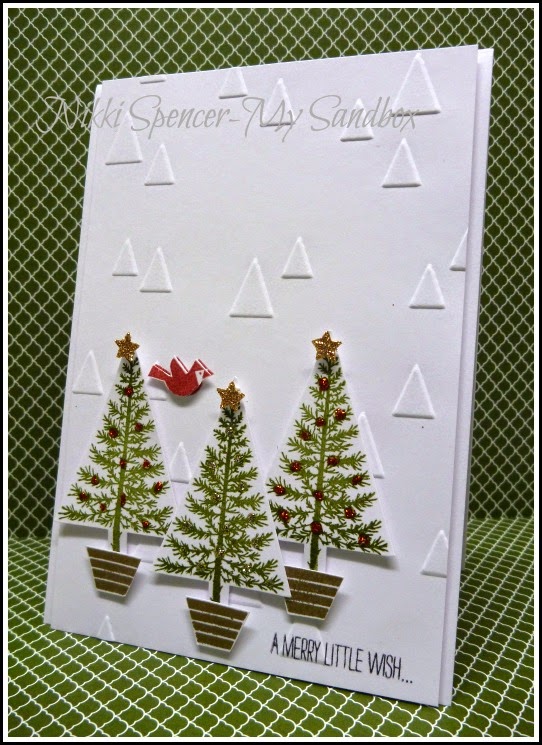
Good Morning, If you read my previous post, you might remember me saying how many cute images were in the "Festival of Trees" set, so l thought l'd share a card l made with another style of tree and the cute little birds.
Do you love that embossed background?..It's another newbie coming up from SU called the "On Point" embossing folder, so, so cute and versatile too. I intend to use it for more than just Christmas, as l think it will work great with the other triangle elements that Stampin Up carry at the minute.
I used Moss Meadow on the trees and Gold E/P on the little pot's and Real Red for the birds. Clean & Simple...My kind of Christmas card!


"Thanks for stopping by"
All supplies used are Stampin Up!

Wednesday, August 20, 2014

Card in a Box-Festival of Trees...Sneak Peek!


With Christmas starting to enter our thoughts and some fun new Christmas products from Stampin Up, l thought l would have a play with a "Card in a Box" that's a little different in shape. I came across this gorgeous flower shop sample from the lovely and talented Di Barnes and she has generously supplied a tutorial, that's super easy to follow.
Using the awesome new "Festival of Trees" bundle, l had some fun creating this "Christmas Card in a Box". There are so many cute trees and elements in this set, that l had a hard time deciding which one to use first...:0)
The trees are stamped on Garden Green with Garden Green ink, l've added some dazzling details for the baubles and Gold Foil and Cherry Cobbler glimmer paper for the stars.
And the best part is, it folds flat and fits into a standard envelope!


"Thanks for stopping by"
All supplies used are Stampin Up!

Monday, August 18, 2014

A Wondrous Wreath Birthday!


Shock horror, I'm back with my second post for today and this one is using a brand spanking new stamp set, that will be available at the end of the month from Stampin Up called "Wondrous Wreath".
When purchasing Christmas products, l generally like to buy those which can be used for more than just the intended purpose and this set, although awesome for Christmas,  makes a very pretty floral wreath as well.
I stamped 2 steps of the wreath (so easy with Photopolymer) in Pear Pizzazz and Old Olive on a Very Vanilla card base and added some bitty flower punches in Pink Pirouette, Crisp Cantaloupe and So Saffron.
I also used my Blendies to colour some Basic Pearls....loving this idea, it makes it so easy to have everything matchy, matchy.
I love how dainty it looks...Pretty happy with this one..:0)


"Thanks for stopping by"
All supplies used are Stampin Up!

Flower Patch Memo Blocks......


Good Morning!....As you can see I'm a little taken with the memo block thing and thought l'd share a couple more l made, for two lovely friends l had lunch with today.
I took my colour inspiration from the two mini pens and inked up the gorgeous Photopolymer set called Flower Patch.
It's such a fun way to brighten up some otherwise boring white memo blocks. 


Tangelo Twist-Moss Meadow-Hello Honey & Melon Mambo.


Hello Honey-Moss Meadow-Blackberry Bliss-Black Staz-On & Melon Mambo.

"Thanks for stopping by"
All supplies used are Stampin Up!

Friday, August 15, 2014

Just Add Ink #227.......Chipboard!

'

Happy Friday to you! It's time for this weeks fun Just Add Ink challenge and this one is all about "CHIPBOARD"   Chantell thought it would be fun to add some dimension to our projects.
I decided to combine this weeks challenge with a very special friends birthday and added multiple layers of chipboard to a yummy Blackberry Bliss Sweetheart punch.
Not easy to see, but amongst the twine is some Gold filigree thread (another dance costume leftover)...:0) and l think I've got a new fave embossing folder too!
I really love the fine detail in the "Tiny Triangles Folder" and find myself reaching for it often, the pattern is so versatile and I'm sure it will be a frequent show on my projects..:0)


Just a little bit of co-ordinated packaging...:0)


Don't forget to pop by and check out the design teams lovely projects.

"Thanks for stopping by"
All supplies used are Stampin Up unless noted!

Wednesday, August 13, 2014

Block / Stair Step Cards Pt 2.....


OK, so this is the second one, made using this tutorial from Deb Valder, check out her blog while you're there, she has some fabulous projects.
Here is the direct link to Debs video, it's so easy to follow and so generous of her to share, so please give her credit if you do decide to have a go.

Now, l don't "YET"..:0) own the "Something for Baby" Bundle, so l made do with what l had to create something kinda similar.
I went with a Kraft base, to give the look of wooden blocks and used So Saffron, Crisp Cantaloupe, Pistachio Pudding & Soft Sky.
As l mentioned in my previous post, this one is slightly bigger as you can see in the pic above. The one on the left is created with 4 1/8" x 11 5/8"" cardstock (half A4) (Measurements in previous post) 
I used Debs measurements of 4 1/2" x 12" for the one on the right and you will need to make an envelope to fit that one, as it doesn't fit in our standard Aussie envelopes.

They are just a little fun and different whichever size you make....


"Thanks for stopping by"
All supplies used are Stampin Up!

Block / Stair Step Card...Pt1


Afternoon blog friends, today l have a card that's a little different to share. It was inspired by the ever so talented Deb Valder.
I've made 2 of these, the second I'll be sharing in a another post very shortly. Along with a link to Deb's fab video, where she gives you the measurements she used.
I decided to alter the measurements to suit our (AU) cardstock, this allows you to get 2 cards from one piece of A4, but is slightly smaller overall, but not much really once it is put together. 
It will also fit into our standard envelopes when pushed flat, which you can see in the last pic.

If you scroll to the bottom of this post l have provided the measurements l used to create this one....


These are just the measurements for A4 cardstock, you will need to click on the link provided in the following post and watch Deb's video for instructions on how she made it.


BASE CARD: 4 1/8” x 11 5/8”  Scored at 1 3/8”, 2 6/8”, 4 1/8”, 5 1/2”, 67/8”, 8 1/4”,  9 5/8” & 11"
ROTATE 180 degrees and score on the short side at 1 3/8” and 2 3/4”
HINGE: Surplus skinny strip 5/8" from the A4 length, folded to create flap (replaces the extra strip Deb uses)
BLOCK LAYERS:  1 ¼” squares and 1” squares.

"Thanks for stopping by"
All supplies used are Stampin Up unless noted!
(non SU gold thread)