Gallery

Friday, April 26, 2013

Just Add Ink #163


Hey stampers, it's time for this weeks Just Add Ink challenge and we want you to Just Add a "Fun Background". This can be absolutely anything you like as long as you have fun with it! The Design Team girls have some great examples of "Fun Backgrounds" to give you an idea. There are so many great techniques and ways to add a little interest to your project, so have fun and share what you create, we love to see your projects too!
For my "Fun Background" l pulled out my re-inkers in Daffodil Delight, Old Olive, Melon Mambo and Tempting Turquoise and my Aqua Painter. Then pretty much dipped and flicked.
I put a few drops of each colour in a paint palette and put a small amount of water in my Aqua pen, dipped it into one ink colour, applied a little pressure to the pen and just dripped and flicked randomly on my cardstock and then rinsed the pen tip and repeated with the other colours until l was happy with the look.


I first saw this technique when we used it to add some splotches to a scrap page at Convention last year and thought this was the perfect challenge to explore it further. It's heaps of fun and gives a very different result each time.
"Thanks for stopping by and have a great weekend"
Supplies:
Daffodil Delight-Melon Mambo-Old Olive & Tempting Turquoise Re-inkers & Cardstocks
Curly Cute Stamp set & Basic Black Ink-Daffodil Delight Satin Ribbon-Elegant & Bitty Butterfly Punches.
Enamel Accents (Ranger)
All Supplies are Stampin-Up Unless Noted.

Friday, April 19, 2013

Water Colour DSP & Ink Swipe Technique-part2


As promised, I'm back to share what l created using the ink swipe technique from my previous post. I must warn you, this post is once again photo heavy.
Using the piece of card l created with the water colour effect, l made 4 cards inspired by a technique called Patchwork Paper by Jennifer McGuire during the Pattern Play Class.


You can see in the photo below how l cut 1/2" strips of  card stock and adhered it to a piece of Whisper White on the diagonal and cut and die cut pieces from that to create a patchwork effect.
Lot's of fun and definitely one of my fave techniques from class. But l guess rather than make more of my own DSP, l need to dig into my yummy stash of 6"x6" paper pads waiting to be devoured.


And finally a group shot, l think these would make such a lovely gift set with some stamped envelopes and maybe a cute gift box to gift them in.


"Thanks for stopping by"

All Products used are Stampin-Up
(With the exception of Purple E/P on brad)
Colours and images are referenced in my previous post.

Just Add Ink #162


Good Morning!.....It's time for this weeks Just Add Ink challenge and this week we want you to Just Add a "Technique" you haven't tried before. 
If you are anything like me, there are no doubt heaps that you want to try, but just never got around to doing. Well,  this is the perfect opportunity and it can be anything you want!

I went with "Teflon Craft Sheet Ink Swiping & Stamping", l have actually tried the ink on Craft sheet bit before, but used it to create a background on card stock. This one is a little different, l used Perfect Plum, Elegant Eggplant and Always Artichoke and swiped a patch of each on my sheet keeping them separate and lightly misted with water...(Very lightly).
I then used my Secret Garden stamp set and inked them up from my sheet, really simple and fun!


I love the effect of water colour that it gives and can imagine it in many colour combinations. I had heaps of ink left on my sheet after stamping this and grabbed some more card to create an all over DSP look.


I will be back shortly to show you how l used my water colour DSP and combined it with some techniques from the recent Pattern Play class l enrolled in at Online Classes.
The Design Team have used some very cool techniques to get you motivated, so don't forget to stop by their blogs and check them out too.
"Thanks for stopping by & have a great day"
All Products Used Are Stampin-Up.

Wednesday, April 17, 2013

Pop n Cuts Flowers.


I thought l would pop in and share a couple of Pop n Cuts projects with you. I finally had a little time to play and really wanted to have another go with my Pop n Cuts card base die before it got dusty and forgotten.
I combined it with the Blossom Party Die,a retired SU flower punch, Bird Builder Punch and the Tea Shoppe stamp set and this was the outcome...:0)


I dug into the now retired SAB Designer paper from Stampin-Up called Sycamore St and just love the gorgeous colours and the combinations you can pull from it. On the second one l decided to tone it down a little with a kraft base and Sahara Sand teacup/vase. Not sure which one l like better, but l definitely love them both and have heaps of ideas l want to try.
I decided to leave them greeting free as l figured l would add that later depending on the occasion.


"Thanks for stopping by"
All Products Used Are Stampin-Up 
Unless Noted.
(Kraft Card Stock & Largest Pearls)

Friday, April 12, 2013

Just Add Ink #161


Hey stampers, "IT"S FRIDAY" and of course that means challenge time over at Just Add Ink. We have a great colour challenge happening this week, suggested by Mae.

I love the bold combination they make and really enjoyed using colours that l wouldn't normally combine. I  had lot's of fun with this card, as l actually made the Balloon stamps myself, using "Clear Mount Foam" from SU, Die cut with the Circles #2 Die. what really impressed me was the lovely impression l got. After seeing how well they stamped, l was off rummaging through my dies to see what other shapes l could make, but sadly l am out of foam...:0( Don't you just hate that!
I used my markers to add the balloon knots and string and l also had a play with Heat Embossing my brad and love that idea too!


Don't forget to check out the DT creations, lot's of variety and lovely inspiration.

"Thanks for stopping by & have a great day"
All Supplies are Stampin-Up unless noted.
(Non SU-Emb/Powder & Lge Brad)

Tuesday, April 9, 2013

A Perfect Pink Peach!


Welcome to the world "Ivy Adele"  It's days like this you realise just how blessed you are.

This sweet little bundle arrived in the early hours of this morning and is just perfect in every way. Weighing a healthy 3.95kg and 51.5cm. She is a little sister to spunky Rafe and makes number four on the Nanny ladder....You have to love that!
Mum, Dad and Ivy all doing well! Thanks guy's for another beautiful Grandchild xxx

Short and sweet for now, l just wanted to share our special moment and now this Nanny needs a nap...:0)

"Thanks for stopping by & l hope your day is just as wonderful"

Friday, April 5, 2013

Just Add Ink #160


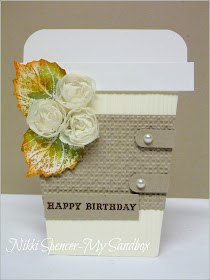
Hey there friends, it's challenge time again at Just Add Ink and this week we have a lovely inspiration pic from Trish. I really liked this one, with it's warm & cozy images, just perfect for the yucky Melbourne weather of late!

I pretty much took inspiration from all parts of it, using the soft neutral colours and texture, the pop of the Autumn leaf and obviously the cuppa! I had been wanting to try this shape for awhile and new it would work perfectly for this weeks challenge.


Also, it is perfect timing for a gift I'm making for a friends Birthday. I'm halfway through a Crochet cup cuff, geez..try saying that really fast 3 times...:0) Made with Organic neutral coloured soy & bamboo blend crochet cotton, which will be added to a travel mug and Organic coffee sachets. It makes a great little gift for a coffee addict!
Don't forget to check out the great Design Team entries for this week, they are all so different and will give you some great ideas to get you started!

"Thanks for stopping by and have a great weekend"
All Products Used are Stampin-Up

Monday, April 1, 2013

MDS....My first attempt!


I'm excited! Last night l downloaded the new MDS (My Digital Studio) trial from Stampin-Up and l just have to say......Whoohoo! 
Now those of you that know me well, will know that l am technically challenged when it comes to anything in depth, l can blog and do the basics (even though at one point, even they terrified me) I have managed to work my way through and am constantly learning new things and surprising myself with it..:0) When l heard MDS was coming downunder, l was thinking it was not something l would jump into, BUT...after downloading it successfully and very quickly and easily, l thought l would have a little play, just to see what all the fuss was about, and...I love it!
I think as much as l will always be an Ink & stamp in the hand girl, l can totally see the benefits of MDS for scrapbooking and cardmaking. 
Now, what l created is a very simple example and it evolved as l worked my way around the program, playing and discovering just what it could do.
It is actually layered (not the best pic, sorry). I printed two copies on a page and used my punches to cut out the circles from one and popped them up on the other, within the original prints and also used the off cuts to decorate the inside a little. As l said, very basic, but I'm pretty happy that l could create with it at all...:0) and it's not a flat card and l love that you can customize, fonts, colours and images and any size you like.


I'm looking forward to downloading the full version now and playing with the more detailed contents it contains and seeing what else l can come up with.

"Thanks for stopping by"
All Products used are Stampin-Up.